
Each of us have unique talents and gifts; God created us that way so when we work together we are equipped to accomplish His purpose.
I am reminded of that uniqueness when I think about snowflakes. We’ve all heard that no two snowflakes are the same; while I’m not sure that is an absolute scientific fact, it makes the point nonetheless.
One of our favorite winter traditions is to make paper snowflakes—and I can attest to the fact that none of ours are ever exactly the same, for sure. My sister has the ability to make the most intricate, delicate paper snowflakes I’ve ever seen, so she always has an open invitation to our snowflake parties. The images I’m sharing today are her handiwork. Perhaps it’s her eye for symmetry, attention to detail, or patience, but my snowflakes just don’t have the same flair that hers do.
Today’s craft is a bit of a twist on the traditional paper snowflake. Since we have our own ballerina in the house, when I ran across an image of paper snowflake ballerinas, we instantly fell in love. The basic idea is simply to take a ballerina silhouette, then attach your unique paper snowflake as the skirt.
To make these snowflake ballerinas, you will need the following supplies:
- card stock (or other thick paper) for the ballerina silhouettes
- regular computer paper for the snowflakes
- nice sharp scissors
While I prefer to use white paper; if you wanted to use other colors for the snowflake skirts it would be nice as well.
The first step to making these is to print and cut out the ballerina silhouettes. You can find free printable silhouettes in many places on the internet, including here and here (the second set are more of a child’s silhouette). A Google search will turn up many examples. You may need to enlarge the silhouette to get the size you want; I prefer them about 10” tall and that is what I used in the examples shown here.
Set the ballerina silhouettes to the side and prepare for the creative step.
Folding paper to make the snowflake can be a bit tricky. Here is a quick tutorial:
Making crisp edges and cutting sharp lines is key.
Once you have your paper folded, you can do one of two things: just start cutting away, or take the time to draw out an intricate design first and then cut. For kids, drawing a pattern on it first might help them have a bit more direction if they’d like to end up with something delicate, not chunky (as is common for a child making paper snowflakes). Experiment with making your outer edge rounded, or sharp and spiky.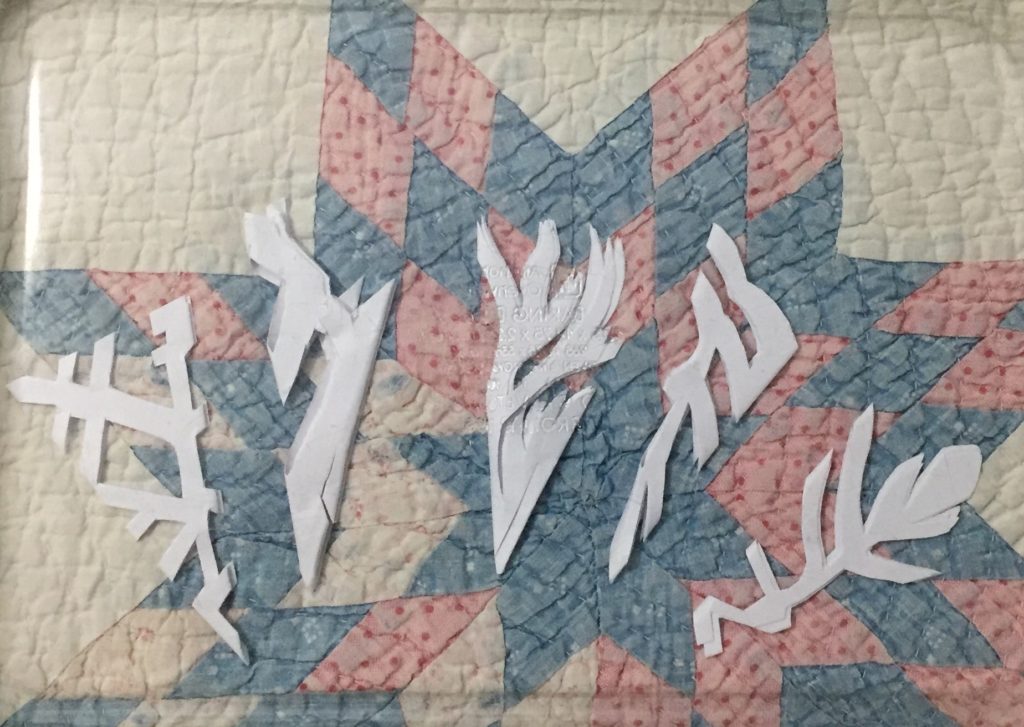
Take care that you leave the center uncut until you open the snowflake. You only want the middle large enough to slide your ballerina through. Once you’re ready to put the skirt on the ballerina, cut open the center of the snowflake just enough to slip the silhouette through. If too much gets cut out of the center, the skirt won’t stay on the ballerina … it might be too loose and fall off.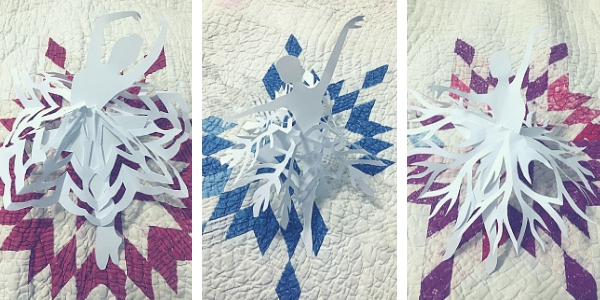
If you want a stiff tutu that stands out to the side, make a smaller-sized snowflake, then use an iron to flatten it out. You’ll need to lay a thin cloth over the paper before ironing, and keep your iron setting on low to medium heat to avoid scorching the paper.
When you are finished, if you choose to hang the snowflake ballerinas (as shown at the top of the page), using a needle and thread is an easy way to do it. Simply thread your needle and pierce each silhouette through the center of the head, then space out as you like along your thread.
So gather up your kiddos, pass around the scissors, and get ready for a dancing blizzard!
Subscribe today to have crafts,
recipes, & inspiration delivered to your inbox!